Hallo zusammen
Ich bin neu mit SeaTable unterwegs und versuche nun über ein Webformular für unsere MA die Möglichkeit anzubieten Büromaterial zu bestellen. Bis jetzt habe ich es soweit gebracht (Dank der Templates und Forumssuche) das der MA ein Produkt und einmal die Menge dafür angeben kann.
Das Produkt wird über ein Selectfeld gewählt, die Menge ist ein Textfeld. Beim Select kann der MA mehrere Produkte wählen, bsp. ein Bleistift und Radiergummi. OK soweit. Wenn er aber 10 bestellt (ins Textfeld eingibt) würde so je 10 Teile bestellt werden.
Das möchte ich aber nicht. Ich hätte gerne das für jedes Produkt auch die entsprechende Menge angegeben werden kann. Analog eines Warenkorbs aufgelistet und anpassbar. Also für Bleistifte 10 Stück, Radiergummis 5 Stück.
Ist das irgendwie möglich in SeaTable abzubilden? Ich habe die Templates durchgeschaut, aber nichts in dieser Richtung gefunden.
Herzlichen Dank für euren Input und Hilfe.
Gruss Jan
Hi, and sorry for my answer in English, I learnt German, but it was a long time ago (too long !!). If you can store some html files somewhere on the internet, you can also create your own form. Here is a very simple example, base on a base composed of two tables :
The first table called Warenkorbs with 3 columns :
Order, auto number column
Produkte, Link to other record column, linked to the Produkten table (limit linking to max one row)
Menge, number column
The second table called Produkent with only two columns :
Name, text column
Warenkorbs, the column automatically created when you create the Produkte column in the Warenkorbs table
Once this is done, you need to activate an API token for your base ( explanations here), and you will also need to get your base UUID (you can find it by clicking on your base in the team admin base page) and your Base Token as explained in the API documentation). Then, you can create an HTML page containing the following code, replace COPY_YOUR_BASE_TOKEN_HERE by your base token (keep it between simple quotes) and COPY_YOUR_BASE_UUID_HERE by your base uuid (here again, keep it between simple quotes).
Of course, it is not the easiest way, and having the base token and base uuid hardcoded in the page obviously create few security problems but I really was curious to see if it could work that way.
Bests,
Benjamin
<html>
<body onload=fillSelect()>
<h1>Order office material</h1>
<p>🛒 Your cart</p>
<div id="cart">
<div id='cartline'>
<select id="product">
<option value="none" disabled selected>Choose product</option>
</select>
<label for="quantity">Quantity (between 1 and 10):</label>
<input type="number" id="quantity" name="quantity" min="1" max="10" required>
</div>
</div>
<br>
<form>
<input type="button" value="Add product" onclick="addLinetoCart()">
<input type="button" value="Order" onclick="order()">
</form>
<p id='successResult'></p>
<script>
var bearer = 'COPY_YOUR_BASE_TOKEN_HERE';
var base_uuid = 'COPY_YOUR_BASE_UUID_HERE';
async function fillSelect() {
// This function is used to fill the select element with the products present in the table. It is launched when the page loads
const options = {
method: 'GET',
headers: {
accept: 'application/json',
authorization: 'Bearer '+bearer
}
};
let select = document.getElementById('product');
let resp = await fetch('https://cloud.seatable.io/dtable-server/api/v1/dtables/'+base_uuid+'/rows/?table_name=Produkten&view_name=Default%20View', options)
.then(response => response.json())
.catch(err => console.error(err));
for(let i=0;i<resp.rows.length;i++) {
var opt = document.createElement('option');
opt.value = resp.rows[i]._id;
opt.innerHTML = resp.rows[i].Name;
await select.appendChild(opt);
}
};
function addLinetoCart() {
// This function is used to create a new line in the cart by copying the first line
const node = document.getElementById("cartline");
const clone = node.cloneNode(true);
document.getElementById("cart").appendChild(clone);
}
async function addRow(id, qte) {
// This function is used to add a row in the "Warenkorbs" table depending on the data of one row of the cart. There are two steps because we need :
// 1. To create a new row in the "Warenkorbs" table
// 2. To create a link between the new line just previously created in the "Warenkorbs" table and the product in the "Produkten" table
const options = {
method: 'POST',
headers: {
accept: 'application/json',
'content-type': 'application/json',
authorization: 'Bearer '+bearer
},
body: JSON.stringify({
row: {Menge: qte.toString()},
table_name: 'Warenkorbs'
})
};
let rowResponse = await fetch('https://cloud.seatable.io/dtable-server/api/v1/dtables/'+base_uuid+'/rows/', options)
.then(response => response.json())
.catch(err => console.error(err));
var origId = rowResponse._id; // We get the ID of the line just created in the "Warenkorbs" table because we need it to create the link to the product
const options2 = {
method: 'POST',
headers: {
accept: 'application/json',
'content-type': 'application/json',
authorization: 'Bearer '+bearer
},
body: JSON.stringify({
table_name: 'Warenkorbs',
other_table_name: 'Produkten',
link_id: 'fv2M',
table_row_id: origId,
other_table_row_id: id
})
};
let linkResponse = await fetch('https://cloud.seatable.io/dtable-server/api/v1/dtables/'+base_uuid+'/links/', options2)
.then(response => response.json())
.catch(err => console.error(err));
return linkResponse;
}
function order() {
// For each line of the cart, we create the row in the database
let liste = document.getElementById('cart');
var success = true;
if (liste.hasChildNodes()) {
var children = liste.childNodes;
for (var i = 0; i < children.length; i++) {
if(children[i].hasChildNodes()) {
var grandChildren = children[i].childNodes;
var id = null;
var qte = null;
for (var j=0;j<grandChildren.length;j++) {
if(grandChildren[j].nodeName=="SELECT") {
console.log(grandChildren[j].options[grandChildren[j].selectedIndex].value);
id = grandChildren[j].options[grandChildren[j].selectedIndex].value
}
else if (grandChildren[j].nodeName=="INPUT") {
console.log(grandChildren[j].value);
qte = grandChildren[j].value
}
}
if (id && qte) {
success = addRow(id,qte);
}
}
}
}
if (success) {document.getElementById('successResult').innerHTML='<b>Your order was successful, thank you !</b>'}
}
</script>
</body>
</html>
Hallo rdb
Danke für das Feedback. Du schreibst …“aktuell leider noch nicht,” dass lässt mich etwas hoffen das dies in zukunft bald mal möglich sein kann
Den alternativen Tipp per App schaue ich mir gerne mal an.
Gruss Jan
No problem. Thanks for your feedback and your template. The idea of trying it without the Seatable form is a good one. I will have a look. I usually use Aidaform, which also offers an API.
Thanks and regards
Jan
If you need more functions with a web form and if you want to avoid the coding work, I would recommend taking a look at https://n8n.io.
n8n is an automation platform that is great for connecting various systems together without coding. Still, you have a lot of control of the data and the data flow.
A German city uses the following combination for many civil processes like “Anwohnerparken” (parking permission for residents) or something that is called “family card”.
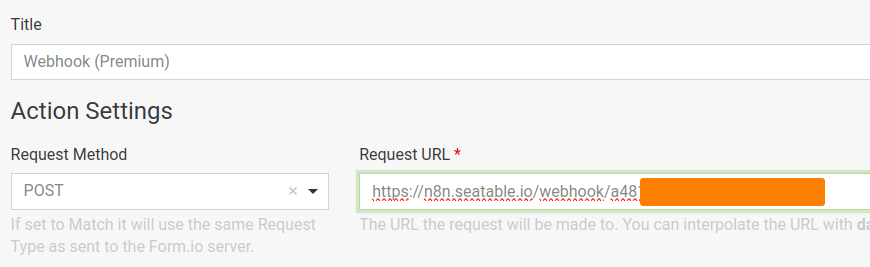
They decided to use form.io because it offers multistep web forms, advanced input validations, etc.
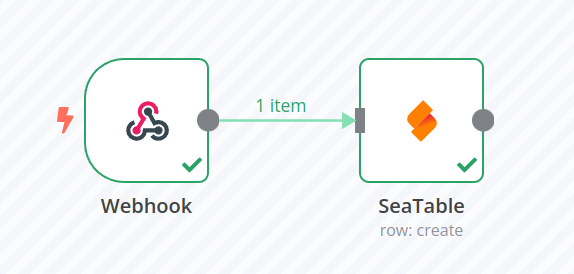
The connection of form.io, n8n and SeaTable is simple. Form.io just sends a webhook after each submission, n8n receives the webhook and writes it to SeaTable.
Probably aidaform can do the same or n8n can get the responses without a webhook but with an API-request.